Pages

Popular Posts

Saturday, December 31, 2011

How to reset MySQL root password option 2

In my previous posting I explained how to reset MySQL root password using" --init-file"  MySQL start up parameter. Yet there is another option using "--skip-grant-tables" MySQL parameter.

Here is how to do it:

1. Shutdown MySQL using /etc/init.d/mysqld stop


2. Star MySQL using "--skip-grant-tables" parameter

/etc/init.d/mysqld-safe --skip-grant-tables


MySQL is now running in back round since we used (&) option 

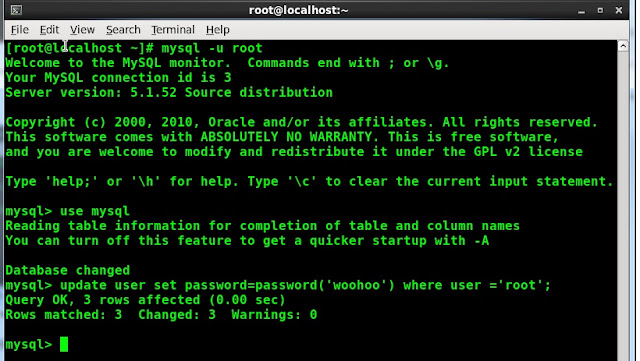
3. Now we can reset any password since MySQL is not validating permissions:

Login as root (you will not be prompted for the passoword) and reset MySQL root passwod:
mysql> update user set Password=PASSWORD('whoohoo') WHERE User='root';


 Pretty cool huh, now you can restart MySQL as usual using "/etc/init.d/mysqld restart" and enjoy the changes.


Thursday, December 29, 2011

How to reset MySQL root password Option 1

How to reset MySQL root password. Did you know it is very easy to reset MySQL root password or any password for that matter.

Option 1.  Use MySQL --init-file parameter MySQL parameter

Why would someone what to do it - for very obvious reasons, someone may forget the password, dba on vacation and hundreds of other possibilities.This blog post will walk you though resetting/changing MySQL root or any other password.

In MySQL realm once you have read and execute permissions to use MySQL executables particularly mysqld and mysqld_safe you already have the capability to reset any password. So no matter how intricate are your MySQL password anyone with execute privileges can reset the passwords.

Here is how to do it:

Create reset password file. This file will be executed on MySQL daemon start up and will update passwords for the desired user in our case we are resetting MySQL root password:

UPDATE mysql.user SET Password=PASSWORD('WooHoo') WHERE User='root';
FLUSH PRIVILEGES;


As you can see from the above we created a text file that simply updates USER table IN 
MYSQL database by setting the password to 'WooHoo'. You can name the file whatever you would like.
 
Shut down MySQL daemon:
Execute /etc/init.d/mysql stop 
 
Start MySQL daemon and use your reset password file you create above to reset the root password:


/usr/bin/mysqld_safe --init-file /root/changepwd.txt 
 
The key here is the MySQL --init-file parameter that instructs MySQL to execute/apply any commands
 that are in the --init-file. You must provide full path to the --init-file. 
 
 
There is also option 2 on how to reset MySQL password and I'll post in my next post. 


Tuesday, December 20, 2011

Ideal MySQL Database Machine

Ideal MySQL Database Machine.
I was asked recently to envision an ideal database box - in terms of configuration. Of course the more CPU and memory is better and SSD (Solid State Drives) would not hurt either. But lets focus on the basics of the configuration - OS, raid, CPU type File systems etc...

CPU. Intel hands down, having used nearly every processor out there (Sparc, Power, Alpha ...) I have settled on Intel. Despite all the advanced in the AMD research Intel still rains supreme in the databases. Now to the number of cores - as many as possible.

Raid. Of course hardware raid. I would strongly vote for Raid 10 (mirror with striping) and most importantly have two controllers - one for the database data files one for the database log files. Be sure to configure LVM (Logical Volume Manager) to enjoy LVM snapshot capability.

Network. Minimum two network cards bonded into a single interface.Most of the databases today have some sort of HA (replication, clustering) so bonding is a must. Not to mention you get better network performance in the end.

Operating System. Unless you have spend past ten years under the rock - you know that Linux is the choice when it comes to the databases - CenOs in my particular case. Install minimum kernel to support the database operation.

Filesystem. XFS for the database data files and database log files.  If using ext3 (ext4) be sure to use noatime and data=writeback for better performance.

MySQL Installation. I have migrated to MariaDB and still prefer the binary (tarball) install vs. rpm. I usually install MySQL in /opt/mysql/MySQL_version_number i.e. /opt/mysql/MySQL_5.1.0. This allows me to maintain several versions during an upgrade process and revert back to the original is case I have issues.


Tuesday, December 13, 2011

Are You Bonding?

Are you Bonding? If not you are missing out on some great features.

It would be pretty hard now days to find a server with a single network card, even some of the laptops have two network interfaces.

Most of the Linux distributions have build in capability for so-called "Channel Bonding". Channel bonding of "Bonded Interfaces" allow you to logically bond (or merge) two or more physical network cards into one logical interface.

Why would someone do that? Several reasons - HA (high availability) and improved performance. If you are using one network card and run your MySQL replication (or clustering) over it and that card dies you will loose your HA, as a mater of fact if you are not bonding, the network card is a single point failure in your HA deployment!

Bonding on the other hand prevents outages and as in case of clustering false failovers in case of network card failures. In many MYSQL HA solution such as DRBD and NDB you must use some type of bonding.

The real of beauty of bonding is that its so simple to configure. Here is how to do it:

cd /etc/sysconfig/network-scripts/    "This is your network config ditectory"

Create new file for your new bonded network interface - will name it bond0

vi bond0 

Add the following lines to the bond0 file:

DEVICE=bond0
IPADDR=192.168.1.20
NETWORK=192.168.1.0
NETMASK=255.255.255.0
USERCTL=no
BOOTPROTO=none
ONBOOT=yes
 
Next modify your physical network card configuration files eh0 and eth1 
(assuming eth0 and eth1 are the names of your network cards)
 
vi eth0
 
 DEVICE=eth0
 USERCTL=no
 ONBOOT=yes
 MASTER=bond0
 SLAVE=yes
 BOOTPROTO=none 
 
 
Notice above that we are making your network card 
a "slave" of our bonded interface bond0
 
MASTER=bond0
SLAVE=yes 
 
Perform the same for the second card eth1:
 
 DEVICE=eth1
 USERCTL=no
 ONBOOT=yes
 MASTER=bond0
 SLAVE=yes
 BOOTPROTO=none 
 
Now we have to make sure that the bonding kernel module loads when we bring up the interface:
 
# vi /etc/modprobe.conf
 
options bond0 mode=balance-alb miimon=100
 
Now load the bonding module:
 
#modprobe bonding
 
Restart your network for the changes to take effect:
 
#service network restart
 
Simple as that.
 
Be sure to test your new bonded interface by shutting down on of the cards eth0 or 
eth1 and making sure your MySQL replication is working.    
 
 We can view the /proc/net/bonding/bond0  to monitor the state of bonded interface;
 
#cat   /proc/net/bonding/bond0
 
Bonding Mode: load balancing (round-robin)
MII Status: up
MII Polling Interval (ms): 100
Up Delay (ms): 200
Down Delay (ms): 200
Slave Interface: eth0
MII Status: up
Link Failure Count: 0
Permanent HW addr: 00:0c:29:c6:be:59
Slave Interface: eth1
MII Status: up
Link Failure Count: 0
Permanent HW addr: 00:0c:29:c6:be:63 


Thursday, December 08, 2011

MariaDB or MySQL ext3 ext4 journaling options for faster databases

MariaDB or MySQL ext3 ext4 journaling options for faster databases.
In my previous posting http://alexalexander.blogspot.com/2011/12/mariadb-and-mysql-performance-boost.html I was suggesting to use "noatime" to improve your databases performance. Now we can go a step further to make things even faster - ext 3 or ext4 filesystem journaling options:

Most of us are aware that modern filesystems (ext3, ext4, xfs, reiser etc...) use journaling. Journaling in concept is very similar to databases write ahead logging WAL it helps to avoid data corruption on the filesystem when the system is abruptly shutdown. On system's comeback the filesystem will replay the journal and correct the data on the filesystem. Awesome concept, but were you aware that there are several options to journaling and depending on the options selected it could improve your database performance?

Linux ext3, ext4 journaling options from fastest to slowest:

data=writeback
When your ext3 filesystem is mounted with data=writeback option ext3(ext4) records onlythe metadata. BTW this is default journaling mode for xfs and Reiserfs filesystems.


data=ordered
data=ordered is recording metadata and grouping metadata related to the data changes. By doing so  it provides more of journaling protection vs. data=writeback at the expense of reduced performance when compared to data=writeback.

data=journal - the is the ext3 default mode
data=journal is recording metadata and all data and is the slowest method at the benefit of full protection against data corruption.

data=writeback will deliver the fastest results for the database mount points. The databases have build in  data protection suchas  - WAL.

How to enjoy the benefits of data=writeback? Very simple. Dismount your filesystem using umount - modify the mounting option by adding data=writeback and mount the filesystem back.  Of course be sure to shut down your MariaDB prior to the unmout/mount. Once completed your /etc/fstab will look like this:

/dev/VolGroup01/LogVol01 /data ext3 noatime, data=writeback, defaults 0 0


Wednesday, December 07, 2011

MariaDB and MySQL performance boost using noatime

MariaDB and MySQL performance boost using noatime. Take a peek at your filesystem mount file on your Linux Box /etc/fstab

/dev/VolGroup01/LogVol01 /data ext3 defaults 0 0

In many cases just like the above you'll see that MySQL data location is mounted with "defaults" options - in our case MySQL data files are located in /data partition.

What does it mean? It means that you are taking a performance hit every time the file is accessed (read or write) on your file system. There is a record created i.e. physically written to the file system, that is besides MySQL access.

The issue is that if you do not explicitly specify "noatime" mount option for your ext3 file system the default "atime" will be used. This option is constantly writing to the disk bogging down your io performance. Unless you have a specific need for "atime" you are wasting io resources especially if you are using database system.

Now to the "noatime", "noatime" writes to the disk every time a particular file was modified, i.e. unlike "atime" the file must be physically modifies in order for "noatime" to generate a physical white to the disk, thus dramatically reducing your io and boosting performance.

So how do you take advantage of this performance boosting option - very simple. Dismount your filesystem using umount - umount /data, modify the mounting option by adding noatime and mount the filesystem back. By far the easiest performance gain in one line modification. Of course be sure to shut down your MariaDB prior to the unmout/mount. Once completed your /etc/fstab will look like this:

/dev/VolGroup01/LogVol01 /data ext3 noatime, defaults 0 0

Tuesday, December 06, 2011

MySQL database backup using Linux LVM

LVM - or simply Logical Volume Manager, Linux LVM is the implementation of Logical Volume Manager for the Linix kernel. Most of the Linux distributions include LVM. Besides obvious benefits of using Logical Volume Manager there is also a great feature - LVM snapshot capability that is included in Linux LVM

LVM snapshot is an awesome tool that is included with your Linux distribution at no charge to you! LVM snapshot allows you to create a new block device that is the exact copy of the logical volume frozen in time.

Why this is such a great capability? Say you have a 500GB database and need to create a replicated slave or take a database backup. In order to do that you have to resort to one of the following:

1. Stop the database (or flush tables with read lock) and copy the files - that could take several hours.

2. Use INNODB backup tools - still will take quite some time and that does not copy your MYISAM tables

3. Use MySQL dump - not even practical for 500 GB database could take days!

Enter the LVM snapshot greatness - very simple, fast and least downtime way to create your MySQL backup and recovery strategy. Most importantly unlike dedicated storage engine backup solutions (IBBACKUP etc...) LVM snapshot will work with your MYISAM tables also.

Here's how to implement it:

First and foremost you must have LVM enabled, assuming that you have you can use LVM commands to explore your logical volumes. LVM commands are located in /sbin/ directory.

Start using LVM

[root@db22 /]# ./sbin/lvm
lvm>

View your logical volumes:


[root@db22 /]# ./sbin/lvm
lvm> lvdisplay
--- Logical volume ---
LV Name /dev/VolGroup00/LogVol00
VG Name VolGroup00
LV UUID u8PhLr-6dfg-WcmL-qzCr-4E6a-2wYB-IlNsrh
LV Write Access read/write
LV Status available
# open 1
LV Size 31.66 GB
Current LE 1013
Segments 1
Allocation inherit
Read ahead sectors 0
Block device 253:0

--- Logical volume ---
LV Name /dev/VolGroup00/LogVol01
VG Name VolGroup00
LV UUID gA8rvW-QwxV-GbLB-KADy-Ank9-9vJx-D3VKz0
LV Write Access read/write
LV Status available
# open 1
LV Size 1.94 GB
Current LE 62
Segments 1
Allocation inherit
Read ahead sectors 0
Block device 253:1

--- Logical volume ---
LV Name /dev/VolGroup01/LogVol01
VG Name VolGroup01
LV UUID KLND46-bfYW-MpaZ-hr2y-6nF4-L1yo-zeT4Zr
LV Write Access read/write
LV Status available
# open 1
LV Size 772.91 GB
Current LE 197866
Segments 2
Allocation inherit
Read ahead sectors 0
Block device 253:2

lvm>

Now you can figure out which logical volume is hosting your database data by viewing /etc/fstab file - your Linux partition mount file:

/dev/VolGroup00/LogVol00 / ext3 defaults 1 1
LABEL=/boot /boot ext3 defaults 1 2
none /dev/pts devpts gid=5,mode=620 0 0
none /dev/shm tmpfs defaults 0 0
none /proc proc defaults 0 0
none /sys sysfs defaults 0 0
/dev/VolGroup00/LogVol01 swap swap defaults 0 0
/dev/VolGroup01/LogVol01 /data ext2 suid,dev,exec 0 0
/dev/hda /media/cdrom auto pamconsole,exec,noauto,managed 0 0


Based on the output of /etc/fstab we can determine that our MySQL data is located in /data mount point that in turn is on /dev/VolGroup01/LogVol01 logical volume. Very easy.

Now to the creating the actual snapshot of the logical volume
/dev/VolGroup01/LogVol01:

Since the data we are taking snapshot of is dynamic (that is true of all database systems), we need to place MySQL in read-only mode for the duration of time it take to create a snapshot in many cases less then a minute:

mysql> flush tables with read lock;

You must maintain the lock while the LVM snapshot is being taken. If you exit your mysql session the tables will be unlocked. There several ways to assure that the tables remain locked:

  1. Stay in your mysql session open another terminal and run snapshot
  2. Place mysql>  session in the backround using "CTRL+z"  (to get back to it use "fg" command"
  3. Run mysql> session in screen

That will stop the updates to the MySQL tables so we can generate a "consistent" view of the data using LVM snapshot.

Since we know the name of the volume we are planning to use /dev/VolGroup01/LogVol01 we will use the LVM and create a snapshot as follows:

./sbin/lvm
lvm> lvcreate -L2000M -s -n snap /dev/VolGroup01/LogVol01
Logical volume "snap" created

Once snapshot is created be sure to unlock MySQL tables:

mysql> unlock tables;


Where is "snap" the name of our snapshot volume and "/dev/VolGroup01/LogVol01" is the name of the volume where MySQL data is located, "L2000M" is the size of the snapshot in megabytes.

Once the snapshot is create we can view it using lvm tool "lvdisplay":


--- Logical volume ---
LV Name /dev/VolGroup01/snap
VG Name VolGroup01
LV UUID ze9d5L-LQWa-bsxY-ubI2-eyYy-t3Uw-v5EbXI
LV Write Access read/write
LV snapshot status active destination for /dev/VolGroup01/LogVol01
LV Status available
# open 0
LV Size 772.91 GB
Current LE 197866

Once the snapshot volume is created it must be mounted to copy the data from it, in order to do that new snapshot volume must be mounted:

Create new mount destination:

/mysql_snap

>mkdir mysql_snap

Mount the new snapshot using the mount command:

mount /dev/VolGroup01/snap /mysql_snap


32G 1.2G 29G 4% /
/dev/sdc1 99M 15M 80M 16% /boot
none 7.9G 0 7.9G 0% /dev/shm
/dev/mapper/VolGroup01-LogVol01
761G 524G 207G 72% /data
/dev/mapper/VolGroup01-snap
761G 524G 207G 72% /mysql_snap

Now since the new volume is mounted we can copy the data anywhere:

Here is the example using rsync:

rsync -av --progress /mysql_snap/ aalexander@db15:/data

Once the copy is completed do not forget to remove the snapshot using the LVM command:

lvm> lvremove /dev/VolGroup01/snap

Monday, December 05, 2011

Oracle Releases "MySQL: A guide to High Availability Solutions"

Oracle Releases "MySQL: A guide to High Availability Solutions". There are several commonly accepted requirements in order to be called a "Guide" such as be informative and attempt to include all of the solutions available.

Oracle's so-called Guide missed all of the above it failed to include:

1. Continuent Tungsten HA
2. Schooner Replication
3. Red Hat Cluster
4. VCS
5. Percona MMM
6. DRBD

But the so-called Guide did not stop there, "The Guide" also miserably fails to even attempt to be informative. It briefly describes solutions already widely known such as replications and MySQL Cluster - Wooo Hoo we have known about those some some time now ...ahhh nearly a decade.

Instead the guide goes into page filling "blah...blah" about causes of failures and meaningless charts. No mention about the best practices or even practical approach to HA.

In conclusion "The Guide" is not a Guide at all but rather a weak sales brochure.