Pages

Popular Posts

Saturday, December 31, 2011

How to reset MySQL root password option 2

In my previous posting I explained how to reset MySQL root password using" --init-file"  MySQL start up parameter. Yet there is another option using "--skip-grant-tables" MySQL parameter.

Here is how to do it:

1. Shutdown MySQL using /etc/init.d/mysqld stop


2. Star MySQL using "--skip-grant-tables" parameter

/etc/init.d/mysqld-safe --skip-grant-tables


MySQL is now running in back round since we used (&) option 

3. Now we can reset any password since MySQL is not validating permissions:

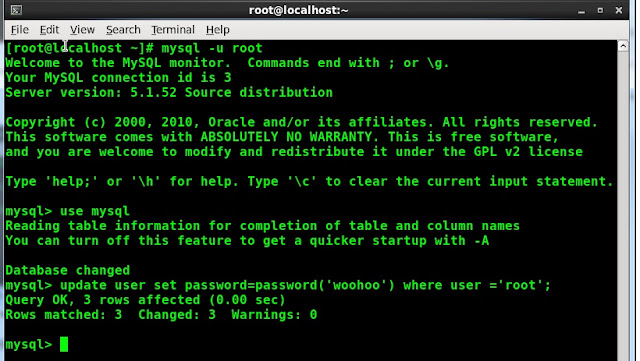
Login as root (you will not be prompted for the passoword) and reset MySQL root passwod:
mysql> update user set Password=PASSWORD('whoohoo') WHERE User='root';


 Pretty cool huh, now you can restart MySQL as usual using "/etc/init.d/mysqld restart" and enjoy the changes.


Thursday, December 29, 2011

How to reset MySQL root password Option 1

How to reset MySQL root password. Did you know it is very easy to reset MySQL root password or any password for that matter.

Option 1.  Use MySQL --init-file parameter MySQL parameter

Why would someone what to do it - for very obvious reasons, someone may forget the password, dba on vacation and hundreds of other possibilities.This blog post will walk you though resetting/changing MySQL root or any other password.

In MySQL realm once you have read and execute permissions to use MySQL executables particularly mysqld and mysqld_safe you already have the capability to reset any password. So no matter how intricate are your MySQL password anyone with execute privileges can reset the passwords.

Here is how to do it:

Create reset password file. This file will be executed on MySQL daemon start up and will update passwords for the desired user in our case we are resetting MySQL root password:

UPDATE mysql.user SET Password=PASSWORD('WooHoo') WHERE User='root';
FLUSH PRIVILEGES;


As you can see from the above we created a text file that simply updates USER table IN 
MYSQL database by setting the password to 'WooHoo'. You can name the file whatever you would like.
 
Shut down MySQL daemon:
Execute /etc/init.d/mysql stop 
 
Start MySQL daemon and use your reset password file you create above to reset the root password:


/usr/bin/mysqld_safe --init-file /root/changepwd.txt 
 
The key here is the MySQL --init-file parameter that instructs MySQL to execute/apply any commands
 that are in the --init-file. You must provide full path to the --init-file. 
 
 
There is also option 2 on how to reset MySQL password and I'll post in my next post. 


Tuesday, December 20, 2011

Ideal MySQL Database Machine

Ideal MySQL Database Machine.
I was asked recently to envision an ideal database box - in terms of configuration. Of course the more CPU and memory is better and SSD (Solid State Drives) would not hurt either. But lets focus on the basics of the configuration - OS, raid, CPU type File systems etc...

CPU. Intel hands down, having used nearly every processor out there (Sparc, Power, Alpha ...) I have settled on Intel. Despite all the advanced in the AMD research Intel still rains supreme in the databases. Now to the number of cores - as many as possible.

Raid. Of course hardware raid. I would strongly vote for Raid 10 (mirror with striping) and most importantly have two controllers - one for the database data files one for the database log files. Be sure to configure LVM (Logical Volume Manager) to enjoy LVM snapshot capability.

Network. Minimum two network cards bonded into a single interface.Most of the databases today have some sort of HA (replication, clustering) so bonding is a must. Not to mention you get better network performance in the end.

Operating System. Unless you have spend past ten years under the rock - you know that Linux is the choice when it comes to the databases - CenOs in my particular case. Install minimum kernel to support the database operation.

Filesystem. XFS for the database data files and database log files.  If using ext3 (ext4) be sure to use noatime and data=writeback for better performance.

MySQL Installation. I have migrated to MariaDB and still prefer the binary (tarball) install vs. rpm. I usually install MySQL in /opt/mysql/MySQL_version_number i.e. /opt/mysql/MySQL_5.1.0. This allows me to maintain several versions during an upgrade process and revert back to the original is case I have issues.


Tuesday, December 13, 2011

Are You Bonding?

Are you Bonding? If not you are missing out on some great features.

It would be pretty hard now days to find a server with a single network card, even some of the laptops have two network interfaces.

Most of the Linux distributions have build in capability for so-called "Channel Bonding". Channel bonding of "Bonded Interfaces" allow you to logically bond (or merge) two or more physical network cards into one logical interface.

Why would someone do that? Several reasons - HA (high availability) and improved performance. If you are using one network card and run your MySQL replication (or clustering) over it and that card dies you will loose your HA, as a mater of fact if you are not bonding, the network card is a single point failure in your HA deployment!

Bonding on the other hand prevents outages and as in case of clustering false failovers in case of network card failures. In many MYSQL HA solution such as DRBD and NDB you must use some type of bonding.

The real of beauty of bonding is that its so simple to configure. Here is how to do it:

cd /etc/sysconfig/network-scripts/    "This is your network config ditectory"

Create new file for your new bonded network interface - will name it bond0

vi bond0 

Add the following lines to the bond0 file:

DEVICE=bond0
IPADDR=192.168.1.20
NETWORK=192.168.1.0
NETMASK=255.255.255.0
USERCTL=no
BOOTPROTO=none
ONBOOT=yes
 
Next modify your physical network card configuration files eh0 and eth1 
(assuming eth0 and eth1 are the names of your network cards)
 
vi eth0
 
 DEVICE=eth0
 USERCTL=no
 ONBOOT=yes
 MASTER=bond0
 SLAVE=yes
 BOOTPROTO=none 
 
 
Notice above that we are making your network card 
a "slave" of our bonded interface bond0
 
MASTER=bond0
SLAVE=yes 
 
Perform the same for the second card eth1:
 
 DEVICE=eth1
 USERCTL=no
 ONBOOT=yes
 MASTER=bond0
 SLAVE=yes
 BOOTPROTO=none 
 
Now we have to make sure that the bonding kernel module loads when we bring up the interface:
 
# vi /etc/modprobe.conf
 
options bond0 mode=balance-alb miimon=100
 
Now load the bonding module:
 
#modprobe bonding
 
Restart your network for the changes to take effect:
 
#service network restart
 
Simple as that.
 
Be sure to test your new bonded interface by shutting down on of the cards eth0 or 
eth1 and making sure your MySQL replication is working.    
 
 We can view the /proc/net/bonding/bond0  to monitor the state of bonded interface;
 
#cat   /proc/net/bonding/bond0
 
Bonding Mode: load balancing (round-robin)
MII Status: up
MII Polling Interval (ms): 100
Up Delay (ms): 200
Down Delay (ms): 200
Slave Interface: eth0
MII Status: up
Link Failure Count: 0
Permanent HW addr: 00:0c:29:c6:be:59
Slave Interface: eth1
MII Status: up
Link Failure Count: 0
Permanent HW addr: 00:0c:29:c6:be:63 


Thursday, December 08, 2011

MariaDB or MySQL ext3 ext4 journaling options for faster databases

MariaDB or MySQL ext3 ext4 journaling options for faster databases.
In my previous posting http://alexalexander.blogspot.com/2011/12/mariadb-and-mysql-performance-boost.html I was suggesting to use "noatime" to improve your databases performance. Now we can go a step further to make things even faster - ext 3 or ext4 filesystem journaling options:

Most of us are aware that modern filesystems (ext3, ext4, xfs, reiser etc...) use journaling. Journaling in concept is very similar to databases write ahead logging WAL it helps to avoid data corruption on the filesystem when the system is abruptly shutdown. On system's comeback the filesystem will replay the journal and correct the data on the filesystem. Awesome concept, but were you aware that there are several options to journaling and depending on the options selected it could improve your database performance?

Linux ext3, ext4 journaling options from fastest to slowest:

data=writeback
When your ext3 filesystem is mounted with data=writeback option ext3(ext4) records onlythe metadata. BTW this is default journaling mode for xfs and Reiserfs filesystems.


data=ordered
data=ordered is recording metadata and grouping metadata related to the data changes. By doing so  it provides more of journaling protection vs. data=writeback at the expense of reduced performance when compared to data=writeback.

data=journal - the is the ext3 default mode
data=journal is recording metadata and all data and is the slowest method at the benefit of full protection against data corruption.

data=writeback will deliver the fastest results for the database mount points. The databases have build in  data protection suchas  - WAL.

How to enjoy the benefits of data=writeback? Very simple. Dismount your filesystem using umount - modify the mounting option by adding data=writeback and mount the filesystem back.  Of course be sure to shut down your MariaDB prior to the unmout/mount. Once completed your /etc/fstab will look like this:

/dev/VolGroup01/LogVol01 /data ext3 noatime, data=writeback, defaults 0 0


Wednesday, December 07, 2011

MariaDB and MySQL performance boost using noatime

MariaDB and MySQL performance boost using noatime. Take a peek at your filesystem mount file on your Linux Box /etc/fstab

/dev/VolGroup01/LogVol01 /data ext3 defaults 0 0

In many cases just like the above you'll see that MySQL data location is mounted with "defaults" options - in our case MySQL data files are located in /data partition.

What does it mean? It means that you are taking a performance hit every time the file is accessed (read or write) on your file system. There is a record created i.e. physically written to the file system, that is besides MySQL access.

The issue is that if you do not explicitly specify "noatime" mount option for your ext3 file system the default "atime" will be used. This option is constantly writing to the disk bogging down your io performance. Unless you have a specific need for "atime" you are wasting io resources especially if you are using database system.

Now to the "noatime", "noatime" writes to the disk every time a particular file was modified, i.e. unlike "atime" the file must be physically modifies in order for "noatime" to generate a physical white to the disk, thus dramatically reducing your io and boosting performance.

So how do you take advantage of this performance boosting option - very simple. Dismount your filesystem using umount - umount /data, modify the mounting option by adding noatime and mount the filesystem back. By far the easiest performance gain in one line modification. Of course be sure to shut down your MariaDB prior to the unmout/mount. Once completed your /etc/fstab will look like this:

/dev/VolGroup01/LogVol01 /data ext3 noatime, defaults 0 0

Tuesday, December 06, 2011

MySQL database backup using Linux LVM

LVM - or simply Logical Volume Manager, Linux LVM is the implementation of Logical Volume Manager for the Linix kernel. Most of the Linux distributions include LVM. Besides obvious benefits of using Logical Volume Manager there is also a great feature - LVM snapshot capability that is included in Linux LVM

LVM snapshot is an awesome tool that is included with your Linux distribution at no charge to you! LVM snapshot allows you to create a new block device that is the exact copy of the logical volume frozen in time.

Why this is such a great capability? Say you have a 500GB database and need to create a replicated slave or take a database backup. In order to do that you have to resort to one of the following:

1. Stop the database (or flush tables with read lock) and copy the files - that could take several hours.

2. Use INNODB backup tools - still will take quite some time and that does not copy your MYISAM tables

3. Use MySQL dump - not even practical for 500 GB database could take days!

Enter the LVM snapshot greatness - very simple, fast and least downtime way to create your MySQL backup and recovery strategy. Most importantly unlike dedicated storage engine backup solutions (IBBACKUP etc...) LVM snapshot will work with your MYISAM tables also.

Here's how to implement it:

First and foremost you must have LVM enabled, assuming that you have you can use LVM commands to explore your logical volumes. LVM commands are located in /sbin/ directory.

Start using LVM

[root@db22 /]# ./sbin/lvm
lvm>

View your logical volumes:


[root@db22 /]# ./sbin/lvm
lvm> lvdisplay
--- Logical volume ---
LV Name /dev/VolGroup00/LogVol00
VG Name VolGroup00
LV UUID u8PhLr-6dfg-WcmL-qzCr-4E6a-2wYB-IlNsrh
LV Write Access read/write
LV Status available
# open 1
LV Size 31.66 GB
Current LE 1013
Segments 1
Allocation inherit
Read ahead sectors 0
Block device 253:0

--- Logical volume ---
LV Name /dev/VolGroup00/LogVol01
VG Name VolGroup00
LV UUID gA8rvW-QwxV-GbLB-KADy-Ank9-9vJx-D3VKz0
LV Write Access read/write
LV Status available
# open 1
LV Size 1.94 GB
Current LE 62
Segments 1
Allocation inherit
Read ahead sectors 0
Block device 253:1

--- Logical volume ---
LV Name /dev/VolGroup01/LogVol01
VG Name VolGroup01
LV UUID KLND46-bfYW-MpaZ-hr2y-6nF4-L1yo-zeT4Zr
LV Write Access read/write
LV Status available
# open 1
LV Size 772.91 GB
Current LE 197866
Segments 2
Allocation inherit
Read ahead sectors 0
Block device 253:2

lvm>

Now you can figure out which logical volume is hosting your database data by viewing /etc/fstab file - your Linux partition mount file:

/dev/VolGroup00/LogVol00 / ext3 defaults 1 1
LABEL=/boot /boot ext3 defaults 1 2
none /dev/pts devpts gid=5,mode=620 0 0
none /dev/shm tmpfs defaults 0 0
none /proc proc defaults 0 0
none /sys sysfs defaults 0 0
/dev/VolGroup00/LogVol01 swap swap defaults 0 0
/dev/VolGroup01/LogVol01 /data ext2 suid,dev,exec 0 0
/dev/hda /media/cdrom auto pamconsole,exec,noauto,managed 0 0


Based on the output of /etc/fstab we can determine that our MySQL data is located in /data mount point that in turn is on /dev/VolGroup01/LogVol01 logical volume. Very easy.

Now to the creating the actual snapshot of the logical volume
/dev/VolGroup01/LogVol01:

Since the data we are taking snapshot of is dynamic (that is true of all database systems), we need to place MySQL in read-only mode for the duration of time it take to create a snapshot in many cases less then a minute:

mysql> flush tables with read lock;

You must maintain the lock while the LVM snapshot is being taken. If you exit your mysql session the tables will be unlocked. There several ways to assure that the tables remain locked:

  1. Stay in your mysql session open another terminal and run snapshot
  2. Place mysql>  session in the backround using "CTRL+z"  (to get back to it use "fg" command"
  3. Run mysql> session in screen

That will stop the updates to the MySQL tables so we can generate a "consistent" view of the data using LVM snapshot.

Since we know the name of the volume we are planning to use /dev/VolGroup01/LogVol01 we will use the LVM and create a snapshot as follows:

./sbin/lvm
lvm> lvcreate -L2000M -s -n snap /dev/VolGroup01/LogVol01
Logical volume "snap" created

Once snapshot is created be sure to unlock MySQL tables:

mysql> unlock tables;


Where is "snap" the name of our snapshot volume and "/dev/VolGroup01/LogVol01" is the name of the volume where MySQL data is located, "L2000M" is the size of the snapshot in megabytes.

Once the snapshot is create we can view it using lvm tool "lvdisplay":


--- Logical volume ---
LV Name /dev/VolGroup01/snap
VG Name VolGroup01
LV UUID ze9d5L-LQWa-bsxY-ubI2-eyYy-t3Uw-v5EbXI
LV Write Access read/write
LV snapshot status active destination for /dev/VolGroup01/LogVol01
LV Status available
# open 0
LV Size 772.91 GB
Current LE 197866

Once the snapshot volume is created it must be mounted to copy the data from it, in order to do that new snapshot volume must be mounted:

Create new mount destination:

/mysql_snap

>mkdir mysql_snap

Mount the new snapshot using the mount command:

mount /dev/VolGroup01/snap /mysql_snap


32G 1.2G 29G 4% /
/dev/sdc1 99M 15M 80M 16% /boot
none 7.9G 0 7.9G 0% /dev/shm
/dev/mapper/VolGroup01-LogVol01
761G 524G 207G 72% /data
/dev/mapper/VolGroup01-snap
761G 524G 207G 72% /mysql_snap

Now since the new volume is mounted we can copy the data anywhere:

Here is the example using rsync:

rsync -av --progress /mysql_snap/ aalexander@db15:/data

Once the copy is completed do not forget to remove the snapshot using the LVM command:

lvm> lvremove /dev/VolGroup01/snap

Monday, December 05, 2011

Oracle Releases "MySQL: A guide to High Availability Solutions"

Oracle Releases "MySQL: A guide to High Availability Solutions". There are several commonly accepted requirements in order to be called a "Guide" such as be informative and attempt to include all of the solutions available.

Oracle's so-called Guide missed all of the above it failed to include:

1. Continuent Tungsten HA
2. Schooner Replication
3. Red Hat Cluster
4. VCS
5. Percona MMM
6. DRBD

But the so-called Guide did not stop there, "The Guide" also miserably fails to even attempt to be informative. It briefly describes solutions already widely known such as replications and MySQL Cluster - Wooo Hoo we have known about those some some time now ...ahhh nearly a decade.

Instead the guide goes into page filling "blah...blah" about causes of failures and meaningless charts. No mention about the best practices or even practical approach to HA.

In conclusion "The Guide" is not a Guide at all but rather a weak sales brochure.

Thursday, August 04, 2011

Microsoft, Skype and PostgreSQL

So Microsoft goes out and buys Skype - probably not a very wise move for the company that currently focused primarily on suing various companies over "patent infringements". Ok all the patents lawsuits aside they have themselves Skype that in turn runs on PostgreSQL and consequently on some flavor of Linux.

Hmmm a tough one - "To migrate or Not To Migrate?!" - that is the question...

By "migrate" I mean from trusted and proved Linux/Postgres combination to Windows (that btw can barely run my laptop and that is after twenty years into the development!) and SQLServer.

The answer if you have any common sense is a very simple and short - NO. But when last time have you seen any common sense come out of Redmond? This is the same company that requires users to push a "Start" button in order to shutdown the operating system.

Thursday, January 15, 2009

Configuring Rman Recovery Catalog

RMAN can be used either with or without a recovery catalog. A recovery catalog is a schema stored in a database that tracks backups and stores scripts for use in RMAN backup and recovery situations. Generally, an experienced DBA would suggest that the Enterprise Manager instance schema and RMAN catalog schema be placed in the same utility database on a server separate from the main servers. The RMAN schema generally only requires 15 megabyte per year per database backed up.

The RMAN schema owner is created in the RMAN database using the following steps:

1. Start SQL*Plus and connect as a user with administrator privileges to the database containing the recovery catalog. For example, enter:

CONNECT SYS/oracle@catdb AS SYSDBA

2. Create a user and schema for the recovery catalog. For example, enter:

CREATE USER rman IDENTIFIED BY cat
TEMPORARY TABLESPACE temp
DEFAULT TABLESPACE tools
QUOTA UNLIMITED ON tools;

3. Grant the recovery_catalog_owner role to the user. This role provides all of the privileges required to maintain and query the recovery catalog:

SQL> GRANT RECOVERY_CATALOG_OWNER TO rman;

Once the owner user is created, the RMAN recovery catalog schema can be added:

1. Connect to the database that contains the catalog owner. For example, using the RMAN user from the above example, enter the following from the operating system command line. The use of the CATALOG keyword tells Oracle this database contains the repository:

% rman CATALOG rman/cat@catdb

2. It is also possible to connect from the RMAN utility prompt:

% rman

RMAN> CONNECT CATALOG rman/cat@catdb

3. Now, the CREATE CATALOG command can be run to create the catalog. The creation of the catalog may take several minutes. If the catalog tablespace is this user's default tablespace, the command would look like the following:

CREATE CATALOG;

While the RMAN catalog can be created and used from either a 9i or 10g database, the Enterprise Manager Grid Control database must be a 9i database. This is true at least for release 1, although this may change with future releases.

Each database that the catalog will track must be registered.

Registering a Database with RMAN

The following process can be used to register a database with RMAN:

1. Make sure the recovery catalog database is open.

2. Connect RMAN to both the target database and recovery catalog database. For example, with a catalog database of RMANDB and user RMAN, owner of the catalog schema, and the target database, AULT1, which is the database to be backed up, database user SYS would issue:

% rman TARGET sys/oracle@ault1 CATALOG rman/cat@rmandb

3. Once connected, if the target database is not mounted, it should be opened or mounted:

RMAN> STARTUP;

--or--

RMAN> STARTUP MOUNT;

4. If this target database has not been registered, it should be registered it in the connected recovery catalog:

RMAN> REGISTER DATABASE;

The database can now be operated on using the RMAN utility.

Example RMAN Operations

The following is an example of the command line connection to a RAC environment, assuming the RAC instances are AULT1 and AULT2:

$ rman TARGET SYS/kr87m@ault2 CATALOG rman/cat@rmandb

The connection string, in this case AULT2, can only apply to a single instance, so the entry in the tnsnames.ora for the AULT2 connection would be:

ault2 =
(DESCRIPTION =
(ADDRESS_LIST =
(LOAD_BALANCE = OFF)
(FAILOVER = ON)
(ADDRESS = (PROTOCOL = TCP)(HOST = aultlinux2)(PORT = 1521))
)
(CONNECT_DATA =
(SERVICE_NAME = ault)
(INSTANCE_NAME = ault2)
)

If the instances use archive logs, RAC requires that a channel connection be specified for each instance that will resolve to only one instance. For example, using the AULT1 and AULT2 instances from the previous example:

CONFIGURE DEFAULT DEVICE TYPE TO sbt;
CONFIGURE DEVICE TYPE TO sbt PARALLELISM 2;
CONFIGURE CHANNEL 1 DEVICE TYPE sbt CONNECT = 'SYS/kr87m@ault1';
CONFIGURE CHANNEL 2 DEVICE TYPE sbt CONNECT = 'SYS/kr87m@ault2';

This configuration only has to be specified once for a RAC environment. It should be changed only if nodes are added or removed from the RAC configuration. For this reason, it is known as a persistent configuration, and it need never be changed for the life of the RAC system. This configuration requires that each of the specified nodes be open, the database is operational, or closed, the database shutdown. If one specified instance is not in the same state as the others, the backup will fail.

RMAN is also aware of the node affinity of the various database files. The node with the greatest access will be used to backup those datafiles that the instance has greatest affinity for. Node affinity can, however, be overridden with manual commands, as follows:

BACKUP
#Channel 1 gets datafiles 1,2,3
(DATAFILE 1,2,3 CHANNEL ORA_SBT_TAPE_1)
#Channel 2 gets datafiles 4,5,6,7
(DATAFILE 4,5,6,7 CHANNEL ORA_SBT_TAPE2)

The nodes chosen to backup an Oracle RAC cluster must have the ability to see all of the files that require backup. For example:

BACKUP DATABASE PLUS ARCHIVELOG;

The specified nodes must have access to all archive logs generated by all instances. This could entail some special considerations when configuring the Oracle RAC environment.

The essential steps for using RMAN in Oracle RAC are:

* Configure the snapshot control file location.

* Configure the control file autobackup feature.

* Configure the archiving scheme.

* Change the archivemode of the database, although this is optional.

* Monitor the archiver process.

The following section will show how the snapshot control file location is configured.

Wednesday, January 14, 2009

clone Oracle database using rman

Clone an Oracle database using RMAN duplicate (same server)
tnsManager - Distribute tnsnames the easy way and for free!

This procedure will clone a database onto the same server using RMAN duplicate.

* 1. Backup the source database.
To use RMAN duplicate an RMAN backup of the source database is required. If there is already one available, skip to step 2. If not, here is a quick example of how to produce an RMAN backup. This example assumes that there is no recovery catalog available:

rman target sys@ nocatalog

backup database plus archivelog format '/u01/ora_backup/rman/%d_%u_%s';

This will backup the database and archive logs. The format string defines the location of the backup files. Alter it to a suitable location.

* 2. Produce a pfile for the new database
This step assumes that the source database is using a spfile. If that is not the case, simply make a copy the existing pfile.

Connect to the source database as sysdba and run the following:

create pfile='init.ora' from spfile;

This will create a new pfile in the $ORACLE_HOME/dbs directory.

The new pfile will need to be edited immediately. If the cloned database is to have a different name to the source, this will need to be changed, as will any paths. Review the contents of the file and make alterations as necessary.

Because in this example the cloned database will reside on the same machine as the source, Oracle must be told how convert the filenames during the RMAN duplicate operation. This is achieved by adding the following lines to the newly created pfile:

db_file_name_convert=(,)
log_file_name_convert=(,)

Here is an example where the source database scr9 is being cloned to dg9a. Note the trailing slashes and lack of quotes:

db_file_name_convert=(/u01/oradata/scr9/,/u03/oradata/dg9a/)
log_file_name_convert=(/u01/oradata/scr9/,/u03/oradata/dg9a/)


* 3. Create bdump, udump & cdump directories
Create bdump, udump & cdump directories as specified in the pfile from the previous step.

* 4. Add a new entry to oratab, and source the environment
Edit the /etc/oratab (or /opt/oracle/oratab) and add an entry for the new database.

Source the new environment with '. oraenv' and verify that it has worked by issuing the following command:

echo $ORACLE_SID

If this doesn't output the new database sid go back and investigate why not.

* 5. Create a password file
Use the following command to create a password file (add an appropriate password to the end of it):

orapwd file=${ORACLE_HOME}/dbs/orapw${ORACLE_SID} password=

* 6. Duplicate the database
From sqlplus, start the instance up in nomount mode:

startup nomount

Exit sqlplus, start RMAN and duplicate the database. As in step 1, it is assumed that no recovery catalog is available. If one is available, simply amend the RMAN command to include it.

rman target sys@ nocatalog auxiliary /

duplicate target database to ;

This will restore the database and apply some archive logs. It can appear to hang at the end sometimes. Just give it time - I think it is because RMAN does a 'shutdown normal'.

If you see the following error, it is probably due to the file_name_convert settings being wrong. Return to step 2 and double check the settings.

RMAN-05001: auxiliary filename '%s' conflicts with a file used by the target database

Once the duplicate has finished RMAN will display a message similar to this:

database opened
Finished Duplicate Db at 26-FEB-05

RMAN>

Exit RMAN.

* 7. Create an spfile
From sqlplus:

create spfile from pfile;

shutdown immediate
startup

Now that the clone is built, we no longer need the file_name_convert settings:

alter system reset db_file_name_convert scope=spfile sid='*'
/

alter system reset log_file_name_convert scope=spfile sid='*'
/

* 8. Optionally take the clone database out of archive log mode
RMAN will leave the cloned database in archive log mode. If archive log mode isn't required, run the following commands from sqlplus:

shutdown immediate
startup mount
alter database noarchivelog;
alter database open;

* 9. Configure TNS
Add entries for new database in the listener.ora and tnsnames.ora as necessary.

Friday, April 25, 2008

How to bring Oracle Database Back from the Dead

How to bring Oracle Database Back from the Dead or how to open an Oracle database with missing (or deleted, or lost) archive logs.

Here is the "typical" scenario you need to open/recover oracle database but you do not have the archive log files - that pretty much renders your Oracle database useless except you do know that that the data is still there and there MUST be a way to open the database without the archive logs and “reset” logfiles…

Here is how to open Oracle Database without archive logs:

1. Shutdown your database.
2. Set the following parameter in your init.ora files (you might need to create pfile from spfile)

_allow_resetlogs_corruption=true
3. Mount your database and issues “alter database open resetlogs”
4. The database will attempt to open but will crash.
5. Edit your init.ora file and and perform the following:

Remove _allow_resetlogs_corruption=true entry
Add undo_management=manual
6. Mount your database
7. Recover database using “recover database command”
8. Open your database – “miracle” your database will open. “alter database open” do not user “alter database open resetlogs”

BUT (It’s a big BUT) the database is not ready yet

Your UNDO tablespace is still in manual mode and the original UNDO tablespace is still corrupted.

Here is how to fix that:

1. Create new undo tablespace i.e UNDOTBS2
2. Set UNDOTBS2 as default undo tablespace
3. Remove undo_management=manual from init.ora
4. Bounce your database


Follow below step to drop your “old” tablespace:

1 – Identify the bad segment -

select
segment_name,
status
from
dba_rollback_segs
where
tablespace_name='undotbs_corrupt'
and
status = ‘NEEDS RECOVERY’;


SEGMENT_NAME STATUS
------------------------------ ----------------
_SYSSMU22$ NEEDS RECOVERY

2. Bounce the instance with the hidden parameter “_offline_rollback_segments”, specifying the bad segment name:

_OFFLINE_ROLLBACK_SEGMENTS=_SYSSMU22$


3. Bounce database, nuke the corrupt segment and tablespace:
SQL> drop rollback segment "_SYSSMU22$";
Rollback segment dropped.

SQL > drop tablespace undotbs including contents and datafiles;
Tablespace dropped.
Now you are done …

Thursday, April 24, 2008

Use FNDCPASS utility to change Oracle Apps passwords

FNDCPASS is an EBS tool to change passwords of database schema's within the Oracle EBS. For example, you can change the APPS password using FNDCPASS, but also any other schema in the EBS database. FNDCPASS can also be used to change the password of an application user (like sysadmin).

To change the APPS password use...
FNDCPASS apps/*** 0 Y system/***** SYSTEM APPLSYS [new_password]

To change any other schema...
FNDCPASS apps/**** 0 Y system/***** ORACLE GL [new_password]

To change the password of a application user
FNDCPASS apps/*** 0 Y system/****** USER SYSADMIN [new_password]

When changing the password of all schemas in the database, you have a lot off FNDCPASS to do...there are almost 200 schemas in the EBS database that need to be changed. Default the password is schema name, so gl/gl and ap/ap...

When installing patch 4676589 (11i.ATG_PF.H Rollup 4) a new feature is added to FNDCPASS. Now you can use the ALLORACLE functionality to change all the schema passwords in one FNDCPASS.

Here is what I did to use the new FNDCPASS feature...

1. install AD: Patch 11i.AD.I.4 (patch 4712852)
2. install patch 5452096
Purging timing information for prior sessions.
sqlplus -s APPS/***** @/appl/prodappl/ad/11.5.0/admin/sql/adtpurge.sql 10 1000
Spawned Process 17504
Done purging timing information for prior sessions.
AutoPatch is complete.
AutoPatch may have written informational messages to the file/appl/prodappl/admin/prod/log/u5452096.lgi
Errors and warnings are listed in the log file/appl/prodappl/admin/prod/log/u5452096.log
and in other log files in the same directory.
3. run the Technology Stack Validation Utility
[oracle@ebs2 bin]$ ./txkprepatchcheck.pl -script=ValidateRollup -outfile=$APPLTMP/txkValidateRollup.html -appspass=apps
*** ALL THE FOLLOWING FILES ARE REQUIRED FOR RESOLVING RUNTIME ERRORS
***STDOUT /appl/prodcomn/rgf/prod_ebs2/TXK/txkValidateRollup_Mon_Jan_8_stdout.log
Reportfile /appl/prodcomn/temp/txkValidateRollup.html generated successfully.
4. run autoconfig
5. apply patch 4676589 (11i.ATG_PF.H Rollup 4, Applications Technology Family)
6. After the install
7. apply patch 3865683 (AD: Release 11.5.10 Products Name Patch)
8. apply patch 4583125 (Oracle XML Parser for Java) see note 271148.1

Verify if the upgrade has been successful..
cd $JAVA_TOP
[oracle@ebs2 java]$ unzip -l appsborg.zip grep 9.0.4
0 04-19-03 02:10 .xdkjava_version_9.0.4.0.0_production
[oracle@ebs2 java]$
if there is an xdkjava_version_9.0.4.0.0_production entry, then XML parser is installed.
9. run autoconfig
10. disable maintenance mode (via adadmin)
Change Maintenance Mode
----------------------------------------
Maintenance Mode is currently: [Enabled].
Maintenance mode should normally be enabled when patchingOracle Applications and disabled when users are logged onto the system. See the Oracle Applications MaintenanceUtilities manual for more information about maintenance mode.
Please select an option:
1. Enable Maintenance Mode
2. Disable Maintenance Mode
3. Return to Main Menu

Enter your choice [3] : 2
sqlplus -s &un_apps/***** @/appl/prodappl/ad/11.5.0/patch/115/sql/adsetmmd.sql DISABLE
Successfully disabled Maintenance Mode.

Now try the new FNDCPASS function..

[oracle@ebs2 prod_ebs2]$ FNDCPASS apps/apps 0 Y system/manager ALLORACLE WELCOME
Log filename : L2726002.log
Report filename : O2726002.out
[oracle@ebs2 prod_ebs2]$
[oracle@ebs2 prod_ebs2]$ sqlplus apps/apps
SQL*Plus: Release 8.0.6.0.0 - Production on Mon Jan 15 08:50:39 2007
(c) Copyright 1999 Oracle Corporation. All rights reserved.
Connected to:
Oracle Database 10g Enterprise Edition Release 10.2.0.2.0 - Production
With the Partitioning, OLAP and Data Mining options
SQL> conn gl/welcome
Connected.
SQL> conn ap/welcome
Connected.
SQL>

Tuesday, April 01, 2008

Oracle Roles and Users Permissions

Users Mapped to Roles and System Privs:

select
lpad(' ', 2*level) || granted_role "User, his roles and privileges"
from
(
/* THE USERS */
select
null grantee,
username granted_role
from
dba_users
where
username like upper('%&enter_username%')
/* THE ROLES TO ROLES RELATIONS */
union
select
grantee,
granted_role
from
dba_role_privs
/* THE ROLES TO PRIVILEGE RELATIONS */
union
select
grantee,
privilege
from
dba_sys_privs
)
start with grantee is null
connect by grantee = prior granted_role;
System privileges to roles and

System Privs to Users and Roles
select
lpad(' ', 2*level) || c "Privilege, Roles and Users"
from
(
/* THE PRIVILEGES */
select
null p,
name c
from
system_privilege_map
where
name like upper('%&enter_privliege%')
/* THE ROLES TO ROLES RELATIONS */
union
select
granted_role p,
grantee c
from
dba_role_privs
/* THE ROLES TO PRIVILEGE RELATIONS */
union
select
privilege p,
grantee c
from
dba_sys_privs
)
start with p is null
connect by p = prior c;

Object Privs:

select
case when level = 1 then own || '.' || obj || ' (' || typ || ')' else
lpad (' ', 2*(level-1)) || obj || nvl2 (typ, ' (' || typ || ')', null)
end
from
(
/* THE OBJECTS */
select
null p1,
null p2,
object_name obj,
owner own,
object_type typ
from
dba_objects
where
owner not in
('SYS', 'SYSTEM', 'WMSYS', 'SYSMAN','MDSYS','ORDSYS','XDB', 'WKSYS', 'EXFSYS',
'OLAPSYS', 'DBSNMP', 'DMSYS','CTXSYS','WK_TEST', 'ORDPLUGINS', 'OUTLN')
and object_type not in ('SYNONYM', 'INDEX')
/* THE OBJECT TO PRIVILEGE RELATIONS */
union
select
table_name p1,
owner p2,
grantee,
grantee,
privilege
from
dba_tab_privs
/* THE ROLES TO ROLES/USERS RELATIONS */
union
select
granted_role p1,
granted_role p2,
grantee,
grantee,
null
from
dba_role_privs
)
start with p1 is null and p2 is null
connect by p1 = prior obj and p2 = prior own;

Tuesday, March 11, 2008

How To Check Oracle Database Uptime

How To Check Oracle Database Uptime.

To check Oracle Database uptime execute the following:

SELECT to_char(startup_time,'DD-MON-YYYY HH24:MI:SS') "DB Startup Time"
FROM sys.v_$instance;

Or for better format:

SELECT to_char(logon_time,'Dy dd Mon HH24:MI:SS') "DB Startup Time"
FROM sys.v_$session
WHERE sid=1 /* this is pmon */

How to View/Extract Oracle view definition in Oracle Database

How to View/Extract Oracle view definition in Oracle Database. Oracle Database 9i 10g 11g

SQL> set long 10000

SQL>select text from dba_views where view_name like "YOUR_VIEW_NAME"

dba_views holds the definition of the view.

Alternative (and better) way is to use GET_DDL() function of metadata package DBMS_METADATA.

select DBMS_METADATA.GET_DDL('Object_Type','Object_name ','owner') for example:


SQL>set long 10000
SQL>select DBMS_METADATA.GET_DDL('VIEW','COU_VW','PRCOWN') FROM dual;

Apple iphone 1.1.4 update error ""Slide for Emergency"

Apple iphone 1.1.4 update error ""Slide for Emergency".

Updating your iphone to Release 1.1.4 may lock your phone in "recovery" mode. My iphone was updated with Rel. 1.1.4, finished updating rebooted and stuck with the message "Slide for Emergency" in several languages. There is nothing you can do at this point since everything is disabled. Calling to Apple support revealed that they have no idea on how to help you in this situation, rebooting your phone is pointless at this time.

Here are the proven remedies that I compiled:

1. Switch your USB ports
2. Unistall iTunes and clean Windows registry using regedit.exe of all Apple and iTunes enties
3. Connect your iphone to a different PC (or MAC) with iTunes that will resynch and restart you iphone.

If everything fails

4. Download ZIPphone utilities from www.ziphone.org for your Release. DO NOT select to "unlock" your phone, simply go to "Advanced Features" tab and click on "Normal Mode" button. That action will exit your phone from the "recovery mode".

Good luck and remember just like with the database upgrades – always have backup.

Friday, March 07, 2008

How to Calculate Oracle Table Size

How to Calculate/Compute Oracle Table Size:

select
segment_name table_name,
sum(bytes)/(1024*1024) table_size
from
user_extents
where
segment_type='TABLE'
and
segment_name = 'YOUR_TABLE_NAME'
group by segment_name

Monday, February 11, 2008

Oracle Database Hidden Parameters

REM Script for getting undocumented init.ora
REM
COLUMN parameter FORMAT a37
COLUMN description FORMAT a30 WORD_WRAPPED
COLUMN "Session Value" FORMAT a10
COLUMN "Instance Value" FORMAT a10
SET LINES 100
SET PAGES 0
SPOOL _hidden_ora_params.txt
SELECT
a.ksppinm "Parameter",
a.ksppdesc "Description",
b.ksppstvl "Session Value",
c.ksppstvl "Instance Value"
FROM
x$ksppi a,
x$ksppcv b,
x$ksppsv c
WHERE
a.indx = b.indx
AND a.indx = c.indx
AND a.ksppinm LIKE '/_%' escape '/'
/
SPOOL OFF
SET LINES 80 PAGES 20
CLEAR COLUMNS

Tuesday, February 05, 2008

How to Clone ORACLE_HOME 10.2

Cloning an Oracle Home

Cloning an Oracle home involves creating a copy of the Oracle home and then configuring it for a new environment. If you are performing multiple Oracle Database installations, then you may want to use this method to create each Oracle home, because copying files from an existing Oracle Database installation takes less time than creating a new version of them. This method is also useful if the Oracle home that you are cloning has had patches applied to it. When you clone this Oracle home, the new Oracle home will have the patch updates as well.
Note:
In addition to cloning an Oracle home, you can clone individual Oracle Database installations by using Enterprise Manager Database Control. Oracle Database Administrator's Guide provides detailed information about cloning Oracle Database installations and Oracle homes.
To clone an Oracle home:
1. Verify that the installation of Oracle Database that you want to clone has been successful.
You can do this by reviewing the installActionsdate_time.log file for the installation session, which is normally located in the /orainventory_location/logs directory.
If you have installed patches, then you can check their status by running the following commands:
$ $ORACLE_HOME/OPatch ORACLE_HOME=ORACLE_HOME_using_patch
$ $ORACLE_HOME/OPatch opatch lsinventory


2. Stop all processes related to the Oracle home. Refer to the "Removing Oracle Software" section for more information on stopping the processes for an Oracle home.
3. Create a ZIP file with the Oracle home (but not Oracle base) directory.
For example, if the source Oracle installation is in the /u01/app/oracle/product/10.2.0/db_1, then you zip the db_1 directory by using the following command:
# zip -r db_1.zip /u01/app/oracle/product/10.2.0/db_1


Leave out the admin, flash_recovery_area, and oradata directories that are in the 10.2.0 directory. These directories will be created in the target installation later, when you create a new database there.
4. Copy the ZIP file to the root directory of the target computer.
5. Extract the ZIP file contents by using the following command:
# unzip -d / db_1.zip


6. Repeat steps 4 and 5 for each computer where you want to clone the Oracle home, unless the Oracle home is on a shared storage device.
7. On the target computer, change directory to the unzipped Oracle home directory, and remove all the .ora (*.ora) files present in the unzipped $ORACLE_HOME/network/admin directory.
8. From the $ORACLE_HOME/oui/bin directory, run Oracle Universal Installer in clone mode for the unzipped Oracle home. Use the following syntax:
$ORACLE_HOME/oui/bin/runInstaller -silent -clone ORACLE_HOME="target location" ORACLE_HOME_NAME="unique_name_on node" [-responseFile full_directory_path]


For example:
$ORACLE_HOME/oui/bin/runInstaller -silent -clone ORACLE_HOME="/u01/app/oracle/product/10.2.0/db_1" ORACLE_HOME_NAME="db_1"


The -responseFile parameter is optional. You can supply clone-time parameters on the command line or by using the response file named on the command line.
Oracle Universal Installer starts, and then records the cloning actions in the cloneActionstimestamp.log file. This log file is normally located in /orainventory_location/logs directory.
9. To create a new database for the newly cloned Oracle home, run Database Configuration Assistant as follows:
$ cd $ORACLE_HOME/bin
$ ./dbca


10. To configure connection information for the new database, run Net Configuration Assistant.
$ cd $ORACLE_HOME/bin
$ ./netca